 Russian
  English
  French
  German
  Spanish
  Polish
  Chinese
  Japanese
  Korean
 Содержание
Введение
A silicone straw cup may appear to be a simple combination of a cup body, lid, and drinking straw.
In actual use, however, these components form a complete pressure, airflow, liquid-flow, and sealing system.
When one dimension or structure is not properly coordinated, the cup may:
- Leak around the lid
- Drip continuously from the straw
- Spray liquid when the body is squeezed
- Leak when shaken or dropped
- Become difficult to drink from
- Require excessive suction force
- Produce an unstable or interrupted flow
- Allow the straw to pull out
- Collapse around the lid
- Leak after repeated assembly
- Perform differently with water, milk, or thicker drinks
- Become deformed during packaging
These failures are not caused by one sealing ring or one material specification.
The final performance depends on the relationship between:
- Cup-body material
- Silicone hardness
- Wall thickness
- Cup-rim roundness
- Lid engagement
- Lid-sealing contact
- Straw-hole dimensions
- Straw outside diameter
- Straw inside diameter
- Air-vent structure
- Anti-spill valve
- Drinking-liquid properties
- Assembly method
- Mold accuracy
- Product shrinkage
- Cleaning and reassembly
- Packaging and storage
For baby brands, importers, wholesalers, private-label sellers, and product developers, the correct question is not only:
“Is this cup leakproof?”
The more useful question is:
“Under which orientation, liquid, temperature, pressure, assembly, and use conditions can the cup control spills while still allowing comfortable drinking?”
This guide explains what buyers should evaluate before custom silicone straw cup tooling, sample approval, and mass production.
Answer Excerpt
Silicone straw cups can leak or become difficult to drink from when the cup rim and lid do not seal evenly, the straw hole is too loose or too tight, the air vent is blocked, the anti-spill valve is incorrectly designed, or the straw dimensions create excessive flow resistance.
Cup-body softness, squeezing pressure, liquid temperature, drink viscosity, assembly direction, molding variation, flash, packaging deformation, and repeated cleaning can also change performance.
A cup that does not leak while standing upright may still leak when tilted, shaken, dropped, carried in a bag, or squeezed by a child.
Reliable performance requires the cup body, rim, lid, straw, vent, valve, handles, material, mold, packaging, and test method to be evaluated as one complete product system.
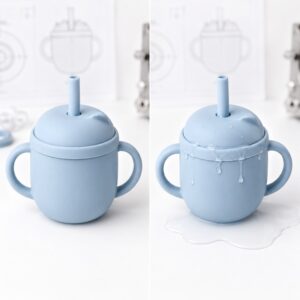
1. A Straw Cup Is a Sealing and Airflow System
During custom silicone straw cup manufacturing, the cup body, lid, straw and vent should be reviewed as one functional assembly.
Liquid cannot flow steadily out of a closed cup unless air can enter and replace the liquid being removed.
A functional straw cup therefore needs to control two paths:
- The liquid path through the straw
- The air path through a vent, valve, lid clearance, or another controlled opening
If the liquid path is too open, the cup may drip or leak.
If the air path is too restricted, the user may experience:
- High suction resistance
- Interrupted drinking
- Cup-wall collapse
- A pulsing flow
- No liquid movement
- Sudden release after pressure builds
If the air path is too open, the cup may leak more easily when:
- Tilted
- Shaken
- Dropped
- Stored sideways
- Squeezed
- Carried in a bag
Spill control and drinking comfort must therefore be designed together.
A cup should not be made more difficult to drink from simply to improve one static leakage test.
2. First Identify the Exact Leakage Path
“Cup leakage” is not one defect.
Liquid may escape from:
- The lid-to-rim interface
- The straw-to-lid interface
- The straw opening
- The air vent
- A valve slit
- A cap or plug
- The cup-body parting line
- A molded pinhole
- A damaged component
- Incorrect assembly
The failure condition should also be recorded.
For example:
- Does it leak while standing?
- Does it leak only when tilted?
- Does it leak after shaking?
- Does it leak when squeezed?
- Does it leak with the straw installed?
- Does it leak without the straw?
- Does it leak after washing?
- Does it leak only with warm liquid?
- Does it leak from every sample or one mold cavity?
The corrective action depends on the actual leakage path.
Tightening the lid will not solve a leak caused by an oversized straw opening or damaged valve slit.
Buyers can compare different silicone straw cup structures before selecting an existing product or developing a new mold.
3. The Cup Rim and Lid Must Form Continuous Contact
The lid normally seals through controlled contact with the cup rim.
Depending on the design, the lid may use:
- An external overlap
- An internal sealing wall
- A groove
- A lip seal
- An interference fit
- A snap feature
- Multiple sealing ribs
- A rigid support ring
The sealing contact must remain continuous around the complete circumference.
Possible problems include:
- One side engaging more deeply
- Local gaps
- Lid distortion
- Rim distortion
- Incomplete assembly
- Uneven sealing pressure
- Flash on the contact surface
- Parting lines crossing the seal
- Different shrinkage between the cup and lid
A lid may feel tight to the user but still contain one local leakage path.
Assembly force and sealing effectiveness are not the same measurement.
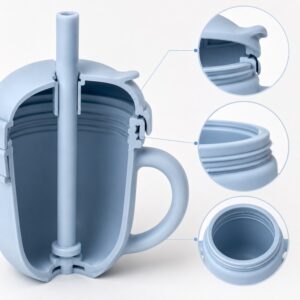
4. Cup-Rim Roundness Is Critical
A circular lid cannot seal reliably against an oval or warped cup rim.
The cup may become out of round because of:
- Uneven wall thickness
- Silicone shrinkage
- Demolding deformation
- Incorrect cooling support
- Packaging pressure
- Long-term stacking
- Excessively soft material
- Lid compression
- Different mold-cavity conditions
Even a small change in roundness can create:
- Uneven lid engagement
- One-sided leakage
- Loose lid sections
- Excessive assembly force on the opposite side
- Lid rotation
- Straw misalignment
Rim inspection should therefore include more than one diameter.
For precision projects, the buyer and manufacturer may need to check:
- Maximum diameter
- Minimum diameter
- Rim thickness
- Rim height
- Flatness
- Circularity
- Lid engagement depth
The cup should also be checked after packaging and storage, not only immediately after molding.
5. A Lid Can Be Too Tight
A very tight lid may appear safer, but excessive interference can create new problems.
Possible results include:
- Difficult assembly
- Difficult removal
- Cup-wall deformation
- Rim rolling
- Lid distortion
- Cup collapse
- Liquid spraying during opening
- User frustration
- Excessive stress after repeated use
A soft cup body may deform before the lid fully reaches its intended sealing position.
This can create the misleading situation in which the lid feels extremely tight but is not assembled correctly.
The target should be controlled engagement with repeatable sealing contact—not maximum assembly force.
6. A Lid Can Also Be Too Loose
An overly loose lid may:
- Detach during carrying
- Rotate around the cup
- Leak during tilting
- Lose sealing pressure
- Allow the straw to shift
- Open when the cup is dropped
- Become less secure after repeated use
Looseness may result from:
- Excessive lid inside diameter
- Small cup-rim diameter
- Material shrinkage
- Incorrect hardness
- Thin sealing ribs
- Mold wear
- Packaging deformation
- Measurement variation
The lid and cup should be sampled and measured as a matched assembly.
Approving the cup and lid independently creates additional risk.
7. The Straw Hole Requires Controlled Interference
The hole around the straw must normally remain tight enough to reduce leakage while allowing assembly and cleaning.
If the straw hole is too large, possible problems include:
- Dripping around the straw
- Leakage when tilted
- Straw movement
- Straw pulling out
- Air entering through an uncontrolled gap
- Variable drinking flow
If the hole is too small, possible problems include:
- Difficult straw installation
- Excessive straw compression
- Reduced internal flow area
- Straw kinking
- Lid distortion
- Tearing around the opening
- High removal force
The design should coordinate:
- Straw outside diameter
- Straw wall thickness
- Lid-hole diameter
- Hole-wall thickness
- Hole-entry radius
- Silicone hardness
- Assembly force
- Required sealing pressure
The straw and lid must be evaluated together using actual molded components.
8. Straw Compression Can Restrict Drinking Flow
A straw may have the correct nominal inside diameter before assembly but become partially closed after being inserted into the lid.
This may happen when:
- The lid hole is too small
- The straw wall is very soft
- The lid is thick
- The hole edge is sharp
- The straw is inserted at an angle
- The straw is bent close to the lid
- The straw is pulled too far upward
Possible symptoms include:
- High suction resistance
- Slow liquid flow
- Interrupted flow
- Straw-wall collapse
- Different performance between samples
The straw should be inspected in its installed condition.
Measuring an unassembled straw alone does not confirm the effective drinking passage after assembly.
9. The Air Vent Controls Drinking Comfort
An air vent allows replacement air to enter the cup while liquid is removed.
The vent may use:
- A small open hole
- A slit valve
- A one-way valve
- A flexible membrane
- A separate plug
- A controlled lid channel
- A valve integrated into the straw opening
If the vent is too restricted, the user may need excessive suction force.
If it is too open, the vent may become a direct leakage path.
Vent performance depends on:
- Hole diameter
- Slit length
- Membrane thickness
- Valve hardness
- Valve opening force
- Liquid surface tension
- Cup orientation
- Internal pressure
- Cleaning condition
- Manufacturing variation
The vent should be evaluated under both drinking and leakage conditions.
10. Anti-Spill Valve Design Requires a Balanced Opening Force
Some straw cups use a cross slit, straight slit, duckbill valve, or another flexible structure to reduce uncontrolled liquid flow.
The valve should remain closed under normal gravity and open under the intended drinking pressure.
If the valve is too soft or the slit is too large, it may:
- Drip continuously
- Leak when tilted
- Open during shaking
- Release liquid when the cup is squeezed
- Become less effective after repeated use
If the valve is too firm or the slit is too small, it may:
- Require excessive suction
- Prevent comfortable drinking
- Produce an interrupted flow
- Remain closed after washing
- Stick together after drying
- Perform differently at lower temperatures
Valve performance depends on more than material hardness.
Important variables include:
- Slit length
- Slit depth
- Membrane thickness
- Valve shape
- Edge quality
- Silicone formulation
- Mold accuracy
- Residual flash
- Liquid type
- Required suction force
The valve should be validated through actual flow testing, not only visual inspection.
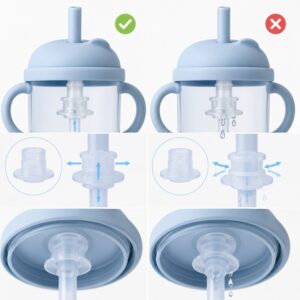
11. Straw Inside Diameter and Length Affect Flow Resistance
A longer or narrower straw generally creates more resistance to liquid flow.
The required suction effort may also increase when:
- The straw has a sharp bend
- The bottom end touches the cup wall
- The straw collapses under vacuum
- The straw opening is partially blocked
- The drink is thicker than water
- A valve is installed in the flow path
- The user must lift liquid through a tall cup
The design should review:
- Straw inside diameter
- Straw outside diameter
- Straw length
- Wall thickness
- Bending radius
- Bottom-end shape
- Distance from the cup base
- Valve position
- Cup height
- Intended drink
A straw selected for a small water cup may not provide the same performance in a taller cup or with a thicker beverage.
12. The Bottom of the Straw Must Remain Open
The lower end of the straw may become restricted when it:
- Presses flat against the cup base
- Contacts the sidewall
- Is cut at an unsuitable angle
- Bends during lid installation
- Is too long
- Is compressed by a bottom feature
- Becomes blocked by thicker food or sediment
Possible structural solutions include:
- Angled straw end
- Side opening
- Rounded cut
- Controlled clearance from the base
- Internal locating structure
- Shorter straw
- Reinforced lower section
The straw should remain positioned so that liquid can enter without creating excessive residual liquid or blocking the opening.
13. Drink Type Changes the Test Result
Water is useful for initial testing, but it cannot represent every intended drink.
Flow and leakage performance may change with:
- Milk
- Formula
- Juice
- Smoothies
- Thin puree
- Warm liquids
- Cold liquids
- Carbonated liquids
- Drinks containing particles
A thicker liquid may require more suction force and may not pass easily through a narrow straw or valve.
Warm liquid may change:
- Silicone flexibility
- Internal air pressure
- Valve response
- Lid engagement
- User perception
A cup should be tested with the intended drink or a representative test liquid with similar flow behavior.
The product instructions and marketing claims should match the validated conditions.
14. A Soft Cup Body Can Create Pressure-Driven Leakage
Children may grip, squeeze, drop, or press the cup body during use.
When a flexible cup is squeezed, internal pressure rises.
That pressure may force liquid through:
- The straw
- The air vent
- A valve
- The lid seal
- A loose straw opening
Possible symptoms include:
- Liquid spraying from the straw
- Dripping after the cup is released
- Vent leakage
- Lid lifting
- Straw displacement
Silicone hardness should therefore be evaluated together with:
- Cup-wall thickness
- Cup diameter
- Handle position
- Grip area
- Internal volume
- Lid structure
- Valve opening pressure
An overly firm cup may reduce squeezing but become uncomfortable or difficult to manufacture.
An overly soft cup may feel pleasant but create uncontrolled internal pressure during normal handling.
15. Handle Position Can Influence Leakage
Handles change where and how the child applies force.
If the handles are connected to a flexible area, gripping may:
- Deform the cup wall
- Pull the rim outward
- Change lid contact
- Increase internal pressure
- Tilt the cup unexpectedly
- Shift the straw
Important handle variables include:
- Handle height
- Connection thickness
- Distance from the rim
- Opening size
- Left-right symmetry
- Grip texture
- Child hand size
- Cup-body reinforcement
The cup should be tested while held by the handles, not only while standing on a table.
16. Wall Thickness and Cup Shape Affect Structural Stability
A tall, narrow cup behaves differently from a short, wide cup.
Cup stability depends on:
- Overall height
- Base diameter
- Rim diameter
- Wall thickness
- Вместимость
- Handle position
- Lid weight
- Straw height
- Silicone hardness
- Liquid fill level
Thin walls may:
- Collapse during drinking
- Deform under lid pressure
- Become oval
- Spray liquid when squeezed
- Recover slowly after packaging
Thick walls may:
- Require greater molding time
- Increase product weight
- Reduce flexibility
- Make the cup feel bulky
- Affect cooling and shrinkage
Wall thickness should be adjusted according to the complete geometry instead of using one uniform value without structural review.
17. Parting Lines and Flash Can Interrupt the Seal
The mold parting line may cross:
- The cup rim
- Lid-sealing ribs
- Straw holes
- Valve slits
- Vent structures
- Handle edges
Excessive flash or an uneven parting line can create:
- Local leakage
- Difficult assembly
- Rough drinking surfaces
- Valve obstruction
- Inconsistent venting
- Straw damage
- Cleaning difficulty
Critical sealing areas should have a defined appearance and flash standard.
A general instruction such as “no flash” is difficult to apply unless the buyer identifies which areas directly affect sealing, drinking, comfort, or cleaning.
18. Small Holes and Valve Features Increase Molding Difficulty
Straw holes, air vents, valve slits, and narrow channels may require small mold cores or precision shutoff structures.
Potential manufacturing defects include:
- Hole too small
- Hole too large
- Partial blockage
- Thin silicone membrane
- Flash inside the hole
- Misaligned opening
- Uneven slit depth
- Torn valve edge
- Core-pin wear
- Cavity-to-cavity variation
Inspection may require:
- Pin gauges
- Optical measurement
- Vision inspection
- Airflow testing
- Water-flow testing
- Assembly testing
- Defined suction or pressure testing
These details should be reviewed during custom silicone mold development rather than relying on manual hole trimming after molding.
19. Assembly Direction and Sequence Matter
A cup may leak because the user or assembly operator installs the components incorrectly.
Possible errors include:
- Lid not fully seated
- Straw inserted from the wrong direction
- Straw not pulled into its locating groove
- Valve installed backward
- Vent plug not closed
- Lid twisted during installation
- Straw length installed incorrectly
- Components mixed between product versions
The design should reduce assembly ambiguity.
Possible controls include:
- Clear orientation
- Asymmetric locating features
- Tactile engagement
- Visual alignment marks
- Component differentiation
- Simple instructions
- Poka-yoke structures
For retail products, testing should include normal consumer reassembly after cleaning.
20. Cleaning Can Change Valve and Seal Performance
Straw cups are frequently disassembled for cleaning.
After washing, possible issues include:
- Valve slit sticking together
- Straw inserted incompletely
- Lid installed while wet
- Soap residue affecting surface behavior
- Small holes remaining blocked
- Components becoming mixed
- Straw stretching during removal
- Valve damage from cleaning tools
The design should provide practical access to:
- Straw interior
- Lid underside
- Air vent
- Valve slit
- Sealing groove
- Cup rim
- Handle connections
A product should not achieve good spill control by creating hidden areas that users cannot clean or inspect properly.
Cleaning and reassembly should be part of sample approval.
When the cup is sold with bowls, spoons, plates or bibs, buyers should also evaluate it as part of the complete silicone baby feeding set.
21. Packaging Can Distort the Cup, Lid, or Straw
A correctly molded straw cup may become defective after packaging.
Common causes include:
- Cup compressed into a small box
- Lid stored at an angle
- Straw sharply folded
- Handles pressed inward
- Heavy accessories placed on the rim
- Tight plastic bags
- Long-term stacking
- Heat during storage or transportation
Possible results include:
- Oval cup rim
- Warped lid
- Kinked straw
- Deformed valve
- Loose lid fit
- Uneven straw-hole sealing
- Permanent handle deformation
Packaging tests should use actual molded samples and final packaging materials.
The product should be inspected before packaging, after storage, after transport simulation, and after a defined recovery period.
22. Sample Testing Should Reproduce Real Use
A straw cup should not be approved only because it does not leak while standing upright.
A practical test plan may include:
- Upright standing test
- Side-tilt test
- Inverted test
- Shaking test
- Drop simulation
- Cup-body squeeze test
- Handle-grip test
- Straw pull test
- Lid assembly and removal
- Repeated opening and closing
- Water-flow test
- Representative drink test
- Suction-effort evaluation
- Valve-opening test
- Vent-function test
- Cleaning and reassembly
- Warm- and cold-liquid testing
- Packaging recovery
The test method should define:
- Fill volume
- Liquid type
- Liquid temperature
- Cup orientation
- Test duration
- Shaking method
- Squeeze location
- Number of cycles
- Acceptable leakage amount
- Acceptable drinking flow
“Leakproof” and “easy to drink from” are not measurable standards until the test conditions are defined.

23. Why Can Samples Pass While Mass Production Fails?
Development samples are usually made under close supervision.
During sampling:
- Cup and lid pairs may be selected carefully
- Mold conditions are adjusted slowly
- Every hole is inspected
- Components are assembled by experienced engineers
- Only one material batch may be used
- Production time is short
Mass production introduces:
- Multiple mold cavities
- Longer continuous runs
- Material-batch variation
- Hardness variation
- Mold-temperature variation
- Core-pin wear
- Vent contamination
- Operator changes
- Assembly-speed variation
- Packaging pressure
- Storage time
A design with little tolerance margin may produce acceptable engineering samples but become inconsistent during continuous production.
Pilot production should compare:
- Cup-rim dimensions
- Lid dimensions
- Straw dimensions
- Hole size
- Valve performance
- Vent airflow
- Lid engagement
- Leakage
- Drinking flow
- Every mold cavity
- Beginning and end of the production run

24. A Practical Straw Cup Failure-Analysis Sequence
When a silicone straw cup leaks or becomes difficult to drink from, investigate the problem systematically.
Recommended sequence:
- Record the exact failure condition.
- Identify the leakage location.
- Confirm the liquid type and temperature.
- Record the cup orientation.
- Test the cup without squeezing.
- Repeat the test while gripping the body or handles.
- Test the cup without the straw.
- Test the cup with the vent temporarily isolated.
- Measure the cup rim and lid.
- Check lid engagement around the complete circumference.
- Measure the straw and lid hole.
- Inspect the straw in its assembled condition.
- Check the air vent and valve slit.
- Compare passing and failing samples.
- Identify mold-cavity numbers.
- Review molding and curing records.
- Check for flash, membranes, or core-pin wear.
- Review cleaning and assembly method.
- Inspect packaging deformation.
- Change one controlled variable and repeat the test.
Do not change lid dimensions, straw size, valve slit, material hardness, and packaging simultaneously.
Changing one variable at a time makes the root cause easier to confirm.
25. What Should Be Validated Before Mass Production?
Before approving a custom silicone straw cup, buyers and manufacturers should confirm:
- Intended user and age range
- Cup capacity
- Cup dimensions
- Silicone material
- Shore A hardness
- Cup-wall thickness
- Cup-rim dimensions
- Cup-rim roundness
- Lid material
- Lid dimensions
- Lid engagement
- Sealing contact
- Straw material
- Straw outside diameter
- Straw inside diameter
- Straw length
- Straw-bottom clearance
- Straw-hole dimensions
- Air-vent structure
- Valve type
- Valve opening force
- Handle structure
- Fill volume
- Intended drink types
- Leakage-test conditions
- Drinking-flow test
- Cleaning method
- Assembly instructions
- Parting-line and flash standard
- Packaging structure
- Pilot-production results
- Cavity traceability
- Final reference sample
Approval should cover both spill control and drinking comfort.
A cup that never leaks but cannot be used comfortably is not a successful product.
How LYA Silicone Supports Custom Straw Cup Projects
LYA Silicone supports OEM and ODM development for custom silicone baby feeding, drinking, teething, bathing, pet, outdoor, educational, household, and lifestyle products.
Our custom silicone straw cup support can include:
- Product-requirement review
- Drawing and sample evaluation
- Cup-body structure review
- Material and hardness selection
- Rim and lid-fit evaluation
- Straw dimension review
- Air-vent and valve discussion
- Wall-thickness review
- Handle-structure development
- Разработка пресс-форм на заказ
- Pantone color matching
- Logo and surface-finish development
- Molded sample production
- Leakage and flow testing support
- Cleaning and assembly review
- Packaging coordination
- Pilot production
- Appearance and dimensional inspection
- OEM/ODM mass production
With 25+ years of silicone manufacturing experience, we help buyers evaluate the complete drinking system rather than treating the cup body, lid, straw, and vent as unrelated components.
The goal is to develop a straw cup that controls spills under defined conditions, allows comfortable drinking, remains easy to clean and assemble, recovers after packaging, and performs consistently during bulk production.
What Information Should Buyers Provide?
To evaluate a custom silicone straw cup project, buyers should provide:
- Product reference photo
- 2D drawing
- 3D file, when available
- Physical sample, when available
- Intended user or age range
- Cup capacity
- Cup dimensions
- Silicone material requirement
- Hardness preference
- Lid structure
- Straw dimensions
- Vent or valve structure
- Handle design
- Intended drink types
- Leakage requirement
- Drinking-flow requirement
- Product color
- Logo file
- Surface finish
- Cleaning method
- Packaging concept
- Target sales market
- Testing requirements
- Estimated quantity
- Expected launch schedule
When an existing cup has a quality problem, buyers should also provide:
- Leakage videos
- Exact leakage location
- Liquid type and temperature
- Cup orientation
- Cup, lid, and straw dimensions
- Material and hardness information
- Mold-cavity number
- Packaging method
- Affected quantity
Frequently Asked Questions
Why does the cup leak only when it is shaken?
Shaking creates dynamic liquid pressure and may temporarily open the vent, valve, straw seal, or lid interface even when the cup passes a static upright test.
Why does liquid spray from the straw when the cup is squeezed?
Squeezing raises the internal pressure. If the straw or valve opens more easily than the vent or lid seal, liquid may be forced through the straw.
Does a tighter lid always prevent leakage?
No. Excessive lid interference may deform the rim or prevent complete assembly. Sealing contact, roundness, dimensions, and material behavior must be coordinated.
Why is the straw cup difficult to drink from?
Possible causes include a blocked vent, overly firm valve, narrow straw, compressed straw wall, long flow path, thick liquid, or incorrect assembly.
Can a smaller straw hole improve spill resistance?
A smaller hole may improve contact around the straw but can also compress the straw, reduce flow, increase assembly force, or tear the lid.
Why does the cup leak after washing?
The lid, straw, valve, or vent may have been reassembled incorrectly. Soap residue, trapped water, stretched components, or a stuck valve can also change performance.
Can the cup be described as completely leakproof?
The appropriate claim depends on the lid, straw, vent, valve, orientation, pressure, liquid, temperature, assembly, and validated test conditions. “Spill-resistant” may be more appropriate for some structures.
Why does one production cavity leak more than another?
Possible causes include cavity dimensional differences, core-pin wear, valve-slit variation, mold-temperature differences, flash, or lid and cup tolerance variation.
Should the product be tested with milk or juice?
The cup should be tested with the intended drink or a representative liquid because viscosity, temperature, and residue can affect flow, valves, vents, and cleaning.
What should buyers approve before bulk production?
Buyers should approve material, hardness, cup dimensions, rim roundness, lid fit, straw dimensions, vent, valve, handles, leakage conditions, drinking flow, cleaning, assembly, packaging, inspection standards, and the final reference sample.
Заключение
A reliable silicone straw cup must do more than remain dry while standing upright.
The cup should control spills during the defined use conditions while allowing the intended user to drink comfortably through a stable liquid and airflow path.
Leakage, dripping, spraying, high suction resistance, and interrupted flow are rarely caused by one component alone.
Cup-rim roundness, lid engagement, straw fit, venting, valve design, straw dimensions, cup softness, handle position, molding, assembly, cleaning, packaging, and real-use testing all influence the final result.
The most reliable approach is to review the complete cup system before tooling, produce actual molded samples, test several liquids and orientations, validate cleaning and reassembly, and confirm consistency through pilot production.
If you are developing a custom silicone straw cup or investigating leakage and drinking-flow problems, contact LYA Silicone and send us your drawing, sample, cup capacity, material, hardness, lid, straw, vent, valve, test conditions, packaging, target market, and estimated quantity. Our team will review the project and provide an appropriate OEM or ODM manufacturing proposal.