 Korean
  English
  French
  German
  Spanish
  Polish
  Chinese
  Japanese
  Russian
 콘텐츠
Answer Excerpt
Measuring marks on 맞춤형 실리콘 제품 should be designed according to the finished container geometry, intended volume increments, silicone shrinkage, wall flexibility, transparency and the required reading method. Equal vertical spacing does not always represent equal volume increments on a tapered or curved container. Buyers should define whether the marks are reference indicators or verified volume marks and approve them using molded samples before mass production.
Adding measuring marks to a silicone product may look simple on a 3D drawing.
A designer may place:
- 20 ml
- 40 ml
- 60 ml
- 80 ml
- 100 ml
along the side of a container and assume the work is finished.
However, several engineering questions still remain:
- Are the marks in the correct vertical positions?
- Does each mark represent the intended volume?
- Is the container cylindrical, tapered or curved?
- Does the soft silicone body deform when filled?
- Are the marks easy to read?
- Will silicone shrinkage move the final mark position?
- Are the marks molded or printed?
- Can every mold cavity reproduce them consistently?
For OEM buyers, capacity marking should therefore be reviewed as part of product engineering rather than treated only as artwork.
Which Silicone Products Commonly Need Measuring Marks?
Measuring marks may be useful on:
- Silicone breast pumps
- Baby training cups
- Measuring cups
- Feeding containers
- Collapsible drinkware
- Silicone bottles
- Mixing containers
- Travel dispensers
A custom silicone breast pump is a particularly useful example.
Its body may be:
- Soft
- Tapered
- Curved
- Translucent
- Squeezed during normal use
This means the mark location and capacity reading cannot be treated exactly like a rigid straight-sided glass container.
The manufacturer needs to evaluate both the product geometry and the way the finished silicone body behaves.
First Decide What the Measuring Marks Are Supposed to Do
Not every printed or molded scale has the same purpose.
Reference Marks
Some products use marks only to provide a general visual reference.
They may help the user estimate approximate contents.
Verified Capacity Marks
Other products may require the indicated volume to correspond to a defined fill quantity under an agreed test method.
These requirements should be distinguished during product development.
A buyer should not ask for “100 ml capacity marks” without explaining whether:
- The 100 ml line is an approximate reference
- The mark needs to correspond to a specified test volume
- The full container capacity must exceed the highest marked volume
- The measurement is read with the product standing naturally
- A particular market or product specification imposes additional requirements
The intended claim should be confirmed before tooling and packaging artwork are finalized.
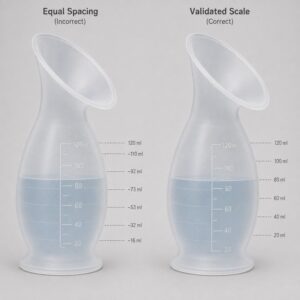
Why Can Equal Spacing Produce Incorrect Volume Marks?
This is one of the most important design points.
If a container has perfectly straight vertical walls and a constant cross-sectional area, equal changes in height may correspond approximately to equal changes in volume.
But many silicone products are not straight cylinders.
A silicone breast pump may have:
- Narrow lower body
- Wider center
- Curved shoulder
- Wide upper opening
- Changing wall angle
In this case, 20 ml of additional liquid may not raise the liquid level by the same height at every part of the container.
Therefore:
Equal volume increments do not necessarily mean equal vertical spacing between marks.
For a tapered container, the mark locations should be derived from the actual internal geometry.
Do not simply divide the visible sidewall into five equal sections and label them 20, 40, 60, 80 and 100 ml.
Why Should Internal Geometry Be Used Instead of External Shape?
Capacity is determined by the internal volume of the product.
External geometry may be affected by:
- Wall thickness
- Decorative ribs
- Grip texture
- Logo areas
- Reinforcement
- Tapered walls
The engineering team should therefore evaluate the inside surface of the container.
Two silicone bottles may look almost identical from the outside but have different internal capacity because one has:
- Thicker walls
- A thicker base
- A deeper internal curve
- A different flange transition
The scale should correspond to the actual internal cavity rather than the external silhouette.
How Does Silicone Flexibility Affect Capacity Reading?
Silicone is different from rigid glass or metal because the container can change shape.
A soft body may deform when:
- Held by hand
- Squeezed
- Tilted
- Placed on an uneven surface
- Filled with liquid
- Pressed by another component
This can temporarily change:
- Internal volume
- Liquid level
- Mark position
- Viewing angle
For repeatable capacity checking, the product should therefore be placed under a defined condition.
For example:
- Product standing naturally
- Stable reference surface
- No squeezing
- No stretching
- Agreed product temperature
- Agreed fill liquid and test method
The inspection condition matters almost as much as the mark itself.
How Does Silicone Shrinkage Affect Measuring Marks?
The 3D drawing represents the target geometry.
The molded silicone product may change dimension during:
- Curing
- Cooling
- Conditioning
- Post-curing where applicable
This means measuring-mark positions should be evaluated on the final molded product.
A scale line positioned correctly in the mold model may shift slightly relative to the finished internal volume if the product does not shrink exactly as originally predicted.
This is another reason why custom silicone mold development should include sample validation before the final scale is approved.
For a critical scale, the normal sequence should be:
3D geometry → mold compensation → molded sample → capacity test → mark adjustment if needed → final approval
Molded Marks or Printed Marks: Which Is Better?
There are several ways to create measurement markings.
Molded Embossed Marks
The scale line and number are raised from the silicone surface.
Advantages include:
- Integrated into the product
- No separate ink layer
- Good long-term physical durability
Possible limitations include:
- Low contrast
- Fine numbers may be difficult to read
- Raised details can affect cleaning if too aggressive
Molded Debossed Marks
The scale is recessed into the silicone surface.
Advantages include:
- Permanent molded feature
- Clean integrated appearance
- No separate printing process
Possible limitations include:
- Deep narrow recesses can reduce cleaning convenience
- Fine numbers may fill incompletely
- Visibility depends on lighting and surface finish
Printed Measuring Marks
A contrasting ink can improve readability.
Advantages include:
- Better visual contrast
- Easy-to-read numbers
- Greater graphic flexibility
Possible limitations include:
- Additional printing operation
- Adhesion must be validated
- Repeated washing and flexing need to be considered
- Registration must align with the actual molded scale position
For some projects, a molded line combined with printed numbers may also be evaluated.
Why Does Transparency Affect Mark Readability?
A translucent silicone body can make liquid levels easier to see.
However, readability can still change because of:
- Product color
- Wall thickness
- Silicone transparency
- Surface texture
- Liquid color
- Background
- Lighting
A dark opaque silicone container may make external marks visible but make the internal liquid level difficult to identify.
A highly translucent material may show the liquid clearly but provide poor contrast for an uncolored molded scale.
The buyer should approve the final combination of:
- Silicone grade
- 색상
- Transparency
- Surface finish
- Marking method
using an actual molded product.
Why Should the Marking Area Remain Relatively Stable?
A measuring scale should preferably be located on an area that does not distort heavily during normal reading.
Avoid placing the main scale across:
- Deep folding rings
- Highly flexible squeeze zones
- Strong ribs
- Severe curvature
- Handles
- Parting-line interference
- Heavily textured zones
If the sidewall bends strongly, the vertical relationship between scale lines becomes harder to read consistently.
The scale area should therefore be considered during the product-structure design.
Example: Measuring Marks on a Silicone Breast Pump
Consider a one-piece manual silicone breast pump with:
- Wide soft flange
- Tapered collection body
- Rounded lower base
- 120 ml nominal marked range
- Translucent silicone
The design team may want marks at:
20 ml
40 ml
60 ml
80 ml
100 ml
120 ml
The correct engineering process should not begin by spacing six lines evenly.
Instead:
Step 1 — Confirm the Internal CAD Volume
Determine the liquid volume corresponding to different heights inside the finished target geometry.
Step 2 — Generate Preliminary Mark Positions
Position each volume line according to the calculated internal volume.
Step 3 — Develop the Mold
Include appropriate compensation for the final silicone geometry.
Step 4 — Produce Molded Samples
Allow the product to reach the agreed inspection condition.
Step 5 — Verify Capacity
Add controlled quantities of test liquid and compare the actual liquid level with the proposed marks.
Step 6 — Correct the Scale if Necessary
If the actual molded product differs from the CAD prediction, adjust the mark position before final approval.
This process is more reliable than treating the scale as simple graphic decoration.
How Should Capacity Be Verified During Sampling?
Capacity verification should use a defined repeatable method.
The inspection plan should specify:
- Test liquid
- Product position
- Test surface
- Product condition
- Fill quantity
- Reading method
- Reading height
- Acceptance criteria
The container should not be squeezed during testing.
For flexible products, a positioning fixture may be useful when it improves repeatability without changing the natural product shape.
A controlled volume-dispensing method or a suitable gravimetric method can be used according to the project requirement.
The important point is consistency:
The buyer and factory should use the same test definition.

Why Should Different Mold Cavities Be Checked?
A multi-cavity mold may produce several products in one cycle.
Capacity and scale position can be influenced by cavity-specific differences in:
- Filling
- Shrinkage
- Dimensions
- Wall thickness
- Surface reproduction
During mold qualification, samples should remain traceable by cavity.
For example:
- Cavity 1
- Cavity 2
- Cavity 3
- Cavity 4
Each active cavity should be checked against the agreed critical dimensional tolerances and capacity requirements.
A perfect sample from cavity 1 does not automatically approve the complete mold.
What Should Buyers Confirm Before Tooling?
Before releasing the mold, confirm:
- Intended total capacity
- Highest marked capacity
- Volume increment
- Reference or verified marking requirement
- Internal product geometry
- Product hardness
- Wall thickness
- Transparency
- Product color
- Mark method
- Scale location
- Number height
- Line width
- Surface finish
- Capacity-test method
- Applicable target-market requirements
This information should become part of the final product specification.
Measuring Mark and Capacity DFM Checklist
| 항목 | What Buyers Should Confirm |
|---|---|
| Intended function | Reference scale or verified volume marking |
| Internal geometry | Used to determine volume positions |
| Mark spacing | Based on actual geometry, not visual guesswork |
| Wall flexibility | Product remains stable during reading |
| Shrinkage | Final molded geometry is validated |
| Transparency | Liquid level can be seen as required |
| Marking method | Molded, printed or combined |
| Scale position | Located on a readable stable area |
| Surface finish | Does not reduce mark visibility |
| Mold cavities | Capacity and scale checked by cavity |
| Test method | Defined before sample approval |
| Production QC | Mark clarity and capacity remain controlled |
How LYA Silicone Supports Capacity and Measuring-Mark Development
LYA Silicone supports OEM and ODM development for silicone baby, maternity, pet, outdoor and other consumer silicone products.
For products requiring measuring marks, project review may include:
- Product drawing review
- Target capacity confirmation
- Internal-volume review
- Silicone material selection
- Hardness and transparency discussion
- Wall-thickness review
- Measuring-mark method
- Mold development
- Sample production
- Capacity checking
- Dimensional inspection
- Mark-clarity inspection
- Pilot production
- Mass-production quality control
Your current breast-pump product offering already includes customizable capacity and measuring marks, with capacity checking included in the production-quality process.
The final scale should be approved on the finished molded product rather than only on a CAD rendering.
Frequently Asked Questions
Can Measuring Marks Be Molded Directly Into Silicone?
Yes.
Embossed or debossed scale marks can be integrated into the mold when the geometry is suitable.
Are 20 ml Increments Always Equally Spaced?
No.
If the internal cross-section changes with height, equal-volume increments may require different vertical spacing.
Are Printed Marks Easier to Read Than Molded Marks?
They can provide stronger contrast, but printing introduces additional adhesion, alignment and durability requirements.
Does Silicone Shrinkage Change the Capacity?
Dimensional change can affect the finished internal geometry, which is why capacity should be verified on actual molded samples.
Can a Flexible Silicone Container Be Measured Accurately?
It can be evaluated repeatably when the product condition, position and test method are defined.
Should Capacity Be Checked on Every Mold Cavity?
Critical capacity or mark-position requirements should be evaluated across active cavities during mold qualification.
Can the Scale Be Changed After the Mold Is Finished?
Printed artwork may be easier to change than mold-integrated marks. Molded scale changes may require modifying the mold insert or cavity.
Should Buyers Provide the Required Capacity Before Tooling?
Yes.
Target capacity and measuring-mark requirements should be confirmed before finalizing the 3D structure and mold.
Verify the Scale on the Finished Silicone Product
A measuring scale is not simply a row of numbers printed on a soft container.
Its accuracy and usability depend on:
- Internal geometry
- Silicone shrinkage
- Flexibility
- Wall thickness
- Mark location
- Transparency
- Manufacturing process
- Capacity testing
Before mass production, verify the scale using the actual molded product under the agreed test conditions.
To develop a silicone product with custom capacity or measuring marks, send LYA 실리콘 your 3D drawing, target capacity, required volume increments, material requirement, hardness, transparency, marking method and estimated order quantity.