 Japanese
 English
 French
 German
 Spanish
 Polish
 Chinese
 Korean
 Russian
内容
Answer Excerpt
Uneven pouring from a silicone baby bath rinse cup can result from an overly wide or flexible pouring edge, an unsuitable rim profile, uneven sidewall transitions, or a cup body that changes shape when filled. Cup opening geometry, water level, and handle position can also affect the pouring direction. OEM buyers should evaluate the pouring edge and the complete cup structure together under repeatable fill and tilt conditions before approving tooling.
Why Does Pouring Control Matter in a Silicone Baby Bath Rinse Cup?
A silicone baby bath rinse cup is designed to scoop water and pour it during baby and toddler bath routines. For a private-label brand, the product should be easy to hold, fill, tilt, rinse, and clean.
The pouring edge is one of the most important functional areas. It determines how water leaves the cup and how consistently the flow can be directed.
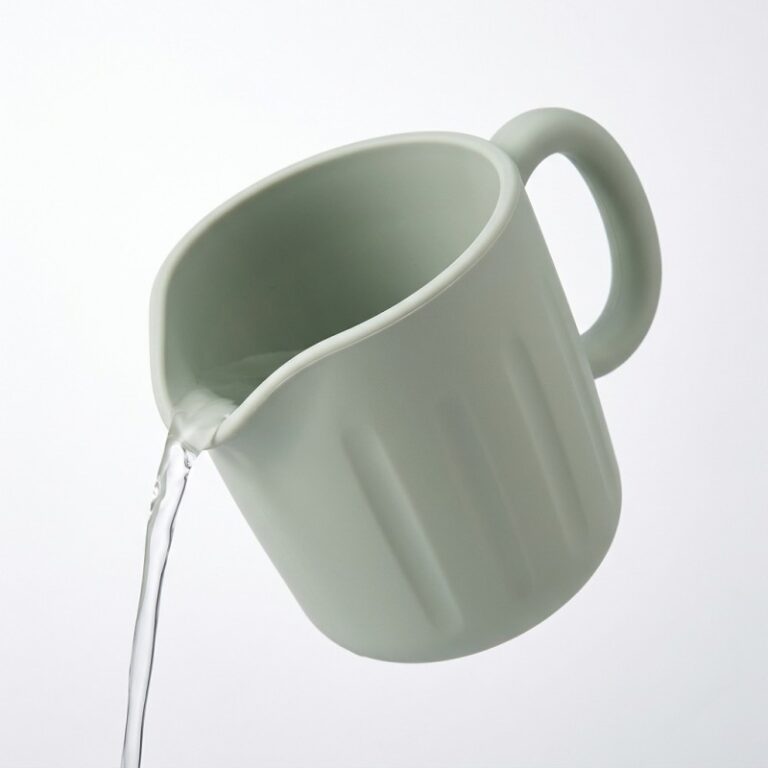
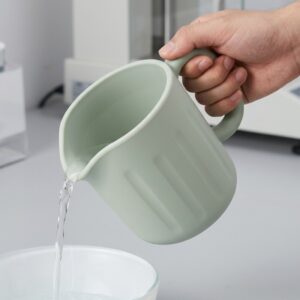
LYA Silicone’s existing custom silicone baby bath rinse cup uses an open one-piece cup structure, an integrated oval-loop handle, and a soft curved front pouring edge. These features provide a practical reference for discussing OEM pouring-edge design.
A cup may have an attractive shape and a comfortable handle but still produce an inconsistent stream if the front rim is too flexible, the edge profile is poorly balanced, or the sidewalls do not guide water evenly toward the pouring area.
For product developers, the goal is not to promise a perfectly controlled stream under every condition. It is to define the intended pouring behavior and validate it using representative samples.
1. What Causes Water to Pour Unevenly?
Several design variables can affect how water leaves a silicone bath rinse cup.
The pouring edge is too wide or too flexible
A wide front edge can provide a broad pouring area, but it may also allow water to spread across a larger section of the rim.
If the edge is too flexible, the weight of the water and the way the cup is tilted may deform the front lip. The release point can then change during pouring.
A narrow edge may create a more concentrated stream, while an excessively wide or soft edge may deform when the cup is filled. The appropriate design depends on the target cup size, intended water volume, silicone hardness, and overall geometry.
The rim profile does not define a consistent release point
The front rim needs a smooth but intentional profile.
If the edge is too flat, water may spread across the front instead of leaving from a clearly defined area. If the transition is too rounded or uneven, water may follow the outside surface and run down the cup body.
For baby bath products, the edge should remain smooth and rounded. The design objective is to create a repeatable water-release path without introducing sharp or uncomfortable edges.
The sidewall transitions are uneven
The sidewalls guide water toward the front opening as the cup tilts.
If the left and right sidewall transitions differ significantly, water may reach the pouring edge unevenly. One side may release water earlier, while the other side retains more water or directs it toward the outside wall.
The front lip should therefore be designed together with the cup opening and both sidewalls.
The cup body changes shape when filled
A soft silicone cup may deform when it contains water.
If the main body is too flexible for its geometry, the opening and pouring edge may change shape as the cup is lifted and tilted.
This can affect the direction and consistency of the water flow.
Hardness and wall thickness should be evaluated together. Making the entire cup harder is not automatically the right solution because the product is intended to retain a soft silicone feel.
The water level and pouring angle are inconsistent
A cup does not pour identically at every fill level or tilt angle.
The amount of water inside changes the load on the cup body. The angle and speed of rotation also affect how water approaches the front edge.
A design that performs acceptably when partly filled may behave differently when nearly full.
OEM sample evaluation should therefore use defined fill levels and repeatable pouring motions rather than relying on one demonstration.
The handle position affects pouring balance
The handle determines where the user applies force when lifting and rotating the cup.
If the handle position is poorly coordinated with the cup body and filled-product weight, the user may need to rotate the wrist excessively or tilt the cup unevenly.
The handle should be considered as part of the overall pouring system, but its ergonomic details should be reviewed separately from the pouring-edge geometry. See our silicone handle and grip design guide for handle opening, section thickness, root transitions, and wet-hand grip considerations.
2. Which Pouring-Edge Features Should OEM Buyers Review?
The pouring edge should not be designed as an isolated thin lip. Its performance depends on several connected dimensions.
Pouring-edge width
The width determines how much of the front rim participates in releasing water.
A narrower edge may concentrate the flow, while a wider edge may distribute it across a broader area.
Buyers should define the preferred pouring behavior and evaluate the width using the actual cup opening and intended water volume.
Front-edge curvature
The curvature influences the shape of the water-release area.
A curved front edge can help guide water toward the intended pouring location. However, the curvature should be coordinated with the cup sidewalls and the front rim height.
A curve that looks attractive in a 3D rendering may still need adjustment after molded samples are tested.
Edge radius and surface transition
The edge should be smooth and rounded for the intended baby bath application.
At the same time, the transition between the inner cup surface, front lip, and outer wall should not create an unintended path that encourages water to run back along the exterior.
The manufacturer should review the complete cross-section rather than only the front-view outline.
Pouring-edge wall thickness
A very thin lip may deform too easily. A very thick lip may become too stiff and change the intended flexibility.
The correct wall structure depends on the cup dimensions, silicone hardness, edge curvature, and expected filled weight.
There is no universal thickness value suitable for every rinse cup. Buyers should define the functional requirements and confirm the final structure through molded samples.
For a broader engineering reference, review the silicone wall-thickness design guide.
Sidewall-to-lip transition
The sidewalls should guide water toward the front edge without creating unnecessary steps or abrupt changes in section.
The left and right transitions should be reviewed together to avoid an uneven approach to the pouring area.
A balanced design can make the flow behavior easier to evaluate and compare across samples.

3. How Do Cup Capacity and Body Geometry Affect Pouring?
Pouring performance is not determined by the front edge alone.
The cup body controls how much water it holds, how the water moves toward the rim, and how the product behaves when lifted.
Cup opening geometry
The opening length and width influence the available pouring area.
An opening that is too broad may allow water to reach a large section of the front rim. A smaller opening may concentrate the water but could make filling and rinsing less convenient.
The opening should be developed together with the front lip and sidewall profile.
Cup-body taper
The body may be designed with a gradual taper between the upper opening and bottom.
The taper affects the internal volume, the way water moves toward the front edge, and the external proportions of the cup.
The design should be evaluated in the intended upright and pouring positions.
Capacity and filled weight
A larger capacity can reduce the number of refills during use, but it also increases the weight when the cup is full.
A smaller cup may be easier to control but may require more frequent refilling.
For OEM development, the target capacity should be selected together with cup dimensions, handle position, wall thickness, and intended user handling.
Do not choose capacity based only on the external appearance of a reference product.
Body stiffness and base stability
The main cup body should maintain a suitable shape when filled and handled.
The bottom should also provide a practical resting surface when the cup is placed on a suitable flat surface.
The design review should consider the relationship between the base, sidewalls, upper rim, and handle rather than optimizing the pouring edge alone.
4. How Should Silicone Hardness and Wall Thickness Be Balanced?
Silicone hardness and wall thickness work together to determine how the cup feels and how its geometry responds to handling.
A softer material may allow more deformation at the front edge. A firmer material may help the cup maintain its shape, but it can also make the pouring lip less flexible.
The manufacturer should review different functional areas separately:
- Front pouring edge: flexibility and shape recovery
- Main cup body: shape stability when filled
- Upper rim: opening stability and comfortable handling
- Handle: grip section and connection-root support
- Bottom: contact stability and resistance to distortion
The objective is not to make every section equally thick or equally firm.
Instead, the material and wall structure should support the intended function of each area.
Final hardness and thickness should be confirmed with molded samples. A material specification by itself cannot demonstrate how the complete cup will pour.
5. How Should OEM Buyers Validate Pouring Behavior?
A product photograph or CAD rendering cannot confirm actual water-flow behavior.
The buyer and manufacturer should agree on a repeatable sample evaluation method before approving the final design.
Step 1: Confirm the intended use and capacity
Define the target cup size, internal capacity, expected water level, and intended pouring direction.
If the product is designed for more than one use scenario, list the scenarios separately.
Step 2: Inspect the molded pouring edge
Check the front-edge width, curvature, edge radius, wall thickness, and transition into the sidewalls.
Look for visible asymmetry, deformation, flash, or surface defects that may affect the water-release path.
Step 3: Use consistent water fill levels
Evaluate the cup at agreed low, medium, and high fill levels.
Use the same water type and comparable test conditions for each sample so that design revisions can be compared fairly.
Step 4: Repeat the pouring motion
Lift and tilt the cup using a consistent method.
Observe whether water leaves from the intended front area, spreads across the rim, separates into uneven streams, or runs down the outer wall.
Step 5: Check the filled-product balance
Evaluate whether the handle allows the cup to be lifted and rotated in a controlled way when it contains the intended amount of water.
The test should consider both the empty and filled product.
Step 6: Compare samples and record observations
If multiple edge designs or material options are being evaluated, compare them using the same fill levels and pouring method.
Record the visible flow path, deformation, external water runback, handling behavior, and any other agreed acceptance criteria.
Step 7: Approve the production-representative sample
The final approved sample should represent the intended material, mold structure, surface finish, and production process.
The buyer and manufacturer should retain the approved sample and the corresponding inspection record as the reference for production.
6. What Should Buyers Check Before Approving the Mold?
Before tooling approval, buyers should confirm that the product requirements are clear enough for design review and sample evaluation.
Important items include:
- Overall cup dimensions
- Top opening length and width
- Target internal capacity
- Front pouring-edge width and curvature
- Front rim height and edge radius
- Wall thickness in the pouring area
- Cup-body taper
- Silicone material and target hardness
- Integrated handle opening and position
- Handle-root transitions
- Bottom geometry and resting stability
- Surface texture and cleaning access
- Color and logo requirements
- Packaging and storage conditions
- Agreed pouring evaluation method
For tooling preparation, the custom silicone mold development checklist can help buyers organize drawings, functional requirements, material selection, critical dimensions, sample approval, and packaging details.
7. What Information Should Buyers Include in a Bath Rinse Cup RFQ?
A complete RFQ helps the manufacturer evaluate the product before quoting tooling and production.
| RFQ Item | Information to Provide |
|---|---|
| Reference product | Product photos, physical sample, or 3D drawing |
| Overall dimensions | Cup height, opening size, and base dimensions |
| Target capacity | Required internal volume or intended water quantity |
| Pouring behavior | Preferred flow direction and pouring scenario |
| Front edge | Width, curvature, radius, and flexibility requirements |
| Cup body | Taper, wall-thickness requirements, and shape preference |
| ハンドル | Opening size, position, and grip requirements |
| 素材 | Silicone material requirements for the target market |
| Hardness | Preferred hardness or reference sample, if available |
| Surface | Smooth, matte, shallow ribs, or custom texture |
| ブランディング | Pantone color, molded logo, or other brand details |
| パッケージング | Individual packaging, retail box, or bath gift-set packaging |
| Order plan | Target market, estimated quantity, and expected launch schedule |
If the buyer has not finalized every dimension, a reference product and clear functional requirements can still help start the review.
The important point is to identify which design requirements are fixed and which can be adjusted after sample evaluation.
Frequently Asked Questions
Why does water run down the outside of a silicone bath rinse cup?
This may happen when the front rim does not create a consistent release path, the edge profile is too rounded or uneven, or the sidewall transition allows water to follow the exterior surface. The complete rim cross-section should be reviewed during sample testing.
Does a wider pouring edge always produce a better water flow?
No. A wider edge may distribute water across a broader area, while a narrower edge may concentrate the stream. The suitable width depends on the cup opening, front-edge curvature, flexibility, and intended use.
Should the pouring edge be made thicker to prevent deformation?
Not automatically. Increasing thickness may improve local support but can also reduce flexibility. Buyers should evaluate edge thickness together with silicone hardness, curvature, and the cup-body structure.
Can the pouring edge be customized for an OEM project?
Yes. The front rim width, curvature, flexibility, height, and transition into the sidewalls can be evaluated according to the buyer’s design and intended pouring behavior.
Does cup capacity affect pouring control?
Yes. A larger water volume increases the filled-product weight and changes how the cup is handled. Capacity, body geometry, handle position, and pouring-edge structure should be considered together.
Can one design be used for different cup capacities?
It depends on the required dimensions and the degree of structural change. If the capacity changes significantly, the cup opening, body taper, wall thickness, handle balance, and pouring edge may also need review.
What should be approved before mass production?
Buyers should approve the cup dimensions, capacity, pouring-edge profile, wall thickness, silicone hardness, handle structure, surface finish, color, logo, packaging, and the agreed sample-evaluation results.
How LYA Silicone Supports Custom Baby Bath Rinse Cup Projects
LYA Silicone supports custom silicone product development for baby care brands, wholesalers, distributors, importers, retailers, and private-label buyers.
For silicone baby bath rinse cup projects, the product page identifies customization options including cup dimensions, internal capacity, curved pouring edge, handle geometry, silicone hardness, wall thickness, grip texture, Pantone colors, molded logos, packaging, tooling, sampling, and inspection.
私たちの OEM/ODM silicone manufacturing service supports project development from product and structure review to tooling, sampling, inspection, packaging, and production.
If you are developing a custom silicone baby bath rinse cup, prepare your reference product, target capacity, pouring-edge requirements, handle concept, material requirements, color, logo, packaging, target market, and estimated quantity.
You can contact LYA Silicone to discuss your OEM or ODM project.