 German
  English
  French
  Spanish
  Polish
  Chinese
  Japanese
  Korean
  Russian
 Inhalt
Answer Excerpt
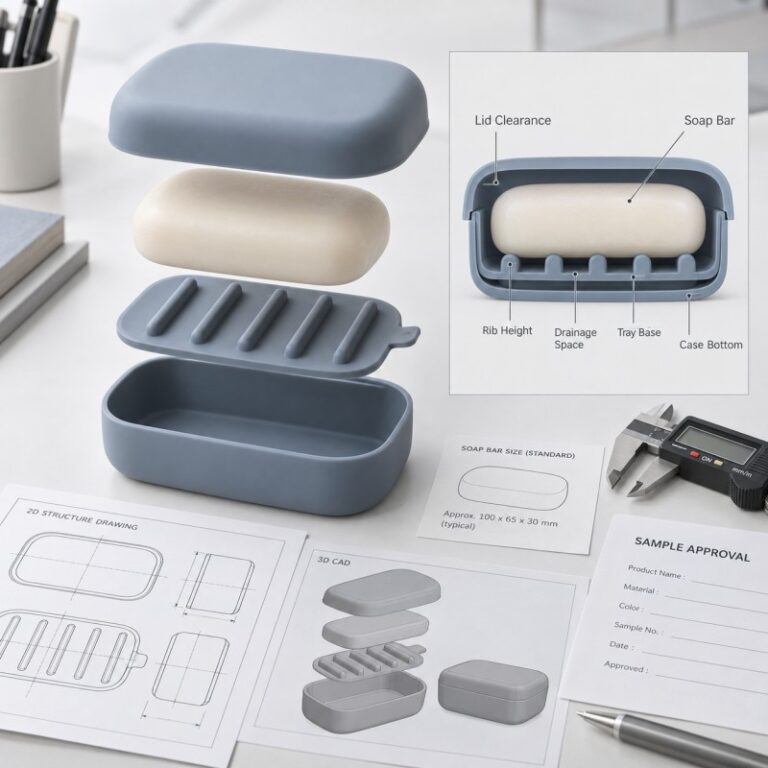
A good silicone soap case drainage insert should lift the soap or shampoo bar above residual moisture without creating a tray that is difficult to remove, rinse or fit inside the case.
Key design variables include support-rib height, rib spacing, drainage clearance, tray thickness, edge clearance, removal features, silicone hardness and the available space between the insert, soap bar and lid. These elements should be validated together on molded samples before mass production.
Why Does a Travel Soap Case Need a Separate Drainage Insert?
A travel soap case has to solve several different problems at the same time.
It needs to:
- Hold the soap bar securely
- Keep the product compact
- Separate the bar from residual water
- Remain easy to open
- Remain easy to rinse
- Fit inside a travel bag
- Avoid unnecessary internal complexity
A removable drainage insert can help separate the soap bar from moisture that collects at the bottom of the case.
But adding an insert also creates another component.
That means the designer now needs to control:
Case → Drainage Insert → Soap Bar → Lid
as one complete system.
If the insert is too tall, the soap may interfere with the lid.
If it is too thin, it may curl.
If it fits too tightly, users may struggle to remove it for cleaning.
The drainage insert therefore deserves its own engineering review.
What Is the Main Function of the Drainage Insert?
The primary purpose is simple:
Keep the soap bar elevated above the lowest internal surface of the case.
The insert can achieve this by using raised support ribs or another open-support structure.
The bar rests on the upper surfaces of those ribs.
Residual moisture can remain below the contact level instead of surrounding the entire bottom surface of the bar.
However, the insert should not be described as automatically keeping the soap completely dry.
Actual moisture behavior depends on:
- How wet the bar is when stored
- How much water enters the case
- Whether the case is closed immediately
- Internal airflow
- Product orientation
- Storage time
The engineering goal is therefore to provide controlled separation and drainage space, not to make an absolute drying claim.
How High Should the Support Ribs Be?
Rib height is one of the most important dimensions.
If the Ribs Are Too Low
The soap may remain very close to collected water.
The available space below the bar can become too small to provide meaningful separation.
If the Ribs Are Too High
The insert consumes more internal height.
This may cause:
- The soap to sit too close to the lid
- Lid interference
- Reduced usable soap thickness
- Higher local pressure on the bar
- A less stable insert
The correct rib height should therefore be determined from the entire internal stack:
Bottom Case → Insert Base → Rib Height → Soap Thickness → Lid Clearance
The insert cannot be designed independently from the internal case height.
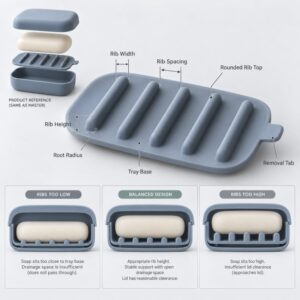
Why Is Rib Spacing Important?
Rib spacing controls both soap support and open drainage area.
If the ribs are too close together:
- Open channels become narrow
- Residue may be harder to rinse away
- The insert begins to behave like a nearly solid platform
- Cleaning access decreases
If the ribs are too far apart:
- Smaller soap bars may sit unevenly
- Soft soap may deform into the gaps
- The bar can tilt
- Local support becomes inconsistent
The spacing should therefore match the expected soap-bar dimensions and condition.
Brands developing cases for shampoo bars or conditioner bars should also consider that those products may have different shapes and firmness from conventional soap bars.
Should the Ribs Run in One Direction or Form a Grid?
Both concepts are possible, but they behave differently.
Parallel Ribs
Parallel rounded ribs can create clear drainage channels.
Possible advantages include:
- Simple geometry
- Easy visual inspection
- Straight rinse paths
- Fewer intersections
Grid Structures
A grid can support the soap from multiple directions.
However, every intersection creates additional geometry.
A dense grid may also create:
- More corners
- Smaller cleaning spaces
- More contact points
- Greater tooling complexity
The layout should therefore follow the functional requirement.
More ribs do not automatically mean better drainage.
Why Should Rib Tops Be Rounded?
The upper surface of the rib directly contacts the soap.
A rounded rib top can provide controlled support without creating a sharp local edge.
Sharp narrow ribs may:
- Press into softer bars
- Create local marks
- Feel more difficult to clean
- Produce less robust molded geometry
Rounded profiles also match the soft, integrated appearance expected from many custom silicone products.
The radius does not need to be visually large.
It simply needs to avoid an unnecessarily sharp contact edge.
How Much Contact Area Should the Insert Have?
This is a balance.
A completely flat tray gives the soap a large contact area, but provides little separation underneath.
Very narrow ribs reduce contact area, but may support the bar poorly.
The product team should therefore consider:
- Number of ribs
- Rib width
- Rib height
- Bar weight
- Bar firmness
- Bar dimensions
The objective is to provide enough support while leaving open space beneath and around the soap.
Why Does the Insert Need Edge Clearance?
A removable insert should not normally be designed to completely jam against the case wall.
Some clearance helps with:
- Placement
- Removal
- Rinsing
- Dimensional variation
- Flexible deformation
However, too much clearance can make the tray move excessively inside the case.
It may:
- Slide sideways
- Rotate
- Lift with the soap
- Look poorly fitted
The correct clearance should provide controlled positioning without turning the removable part into a permanent interference fit.
This is where assembly fit principles become relevant.
Should the Insert Snap Into the Case?
Not necessarily.
A drainage tray can simply rest in a controlled recess.
This can make removal easier.
A retention feature may be useful if the brand wants the insert to stay in position during transport or when removing the soap.
But stronger retention also increases removal force.
Possible approaches include:
- Simple drop-in tray
- Light perimeter engagement
- Small locating ribs
- Shallow locating recesses
The correct approach depends on intended use.
A component that needs frequent cleaning should not be made unnecessarily difficult to remove.
How Should the User Remove the Drainage Tray?
This is frequently overlooked during CAD design.
A tray can fit perfectly and still create poor user experience if there is nowhere to grip it.
Possible removal features include:
- Small flexible pull tab
- Finger-access recess
- Raised edge
- Local lifting corner
The removal feature should be large enough to use but should not interfere with the soap bar or lid.
It should also avoid creating a weak thin section.
For a flexible silicone pull tab, the root connection needs enough support for repeated lifting.
Why Is Tray Thickness Important?
The insert needs enough structure to stay reasonably flat when it is:
- Lifted
- Removed
- Washed
- Reinstalled
- Supporting the soap
If the base is too thin, it may:
- Curl
- Fold during removal
- Lift together with the soap
- Sit unevenly after reinstallation
If the tray is unnecessarily thick:
- Material use increases
- Internal space decreases
- The insert may become harder to flex for removal
As with other silicone products, wall thickness should be selected according to function rather than using one universal value.
How Does Silicone Hardness Affect the Drainage Insert?
A soft drainage tray can be comfortable to remove and bend during cleaning.
But excessive softness may reduce positional stability.
A firmer insert can:
- Hold its shape more clearly
- Support ribs more consistently
- Sit flatter in the lower case
but it may also become harder to flex during removal.
The correct silicone hardness should therefore be evaluated together with:
- Tray thickness
- Rib height
- Rib width
- Pull-tab structure
- Case geometry
Hardness alone does not determine whether the insert will work well.
Does the Insert Need to Use the Same Silicone Hardness as the Case?
Not always.
The lower case may need one type of flexibility while the removable insert may benefit from a different structural feel.
However, using multiple hardness specifications can increase:
- Material management
- Production complexity
- Color matching requirements
- Quality-control requirements
If one hardness can satisfy both components, the production system may be simpler.
A different hardness should be introduced only when it provides a clear functional benefit.
How Should the Insert Fit Different Soap-Bar Sizes?
Before designing the case, the brand should define the intended product range.
For example:
- Standard soap bar
- Shampoo bar
- Conditioner bar
- Facial cleansing bar
The insert should support the smallest intended bar without creating unstable gaps.
At the same time, the largest intended bar must leave enough room for:
- Insertion
- Removal
- Lid closure
- Residual moisture
- Dimensional variation
Brands should provide the manufacturer with actual target-bar dimensions whenever possible.
A physical sample can also be useful during product development.
Why Is Soap-to-Lid Clearance Important?
The drainage tray raises the soap.
That means every millimeter used by the insert reduces the remaining vertical clearance.
If the soap presses against the lid, the product can experience:
- Difficult closure
- Lid bulging
- Unwanted compression
- Deformation during storage
- Increased opening force
The complete internal stack should therefore be checked with the largest intended bar.
Do not approve the drainage tray using an empty case only.
Should the Insert Contain Drainage Holes?
It depends on the case architecture.
A removable ribbed tray may already allow moisture to move beneath the bar without requiring many small holes.
Adding holes can create additional pathways, but they also create:
- More edges
- Additional molding details
- More areas to inspect
- Potential residue pockets if poorly sized
The design should not add holes simply because they visually suggest drainage.
Every feature should have a defined purpose.
How Should the Drainage Insert Be Designed for Cleaning?
A removable insert should make cleaning easier, not create a second difficult-to-clean product.
Good easy-clean design should consider:
- Open rib spacing
- Rounded rib roots
- Smooth corners
- Accessible underside
- Few unnecessary pockets
- Easy tray removal
Very tight rib spacing or deep narrow channels may trap residue.
The user should be able to rinse both:
- The top surface
- The underside
without requiring special tools for normal cleaning.
Why Do Rib Roots Matter?
Every rib connects to the tray base.
A very sharp rib-to-base transition may create:
- Hard-to-clean corners
- Local stress concentration
- More difficult molded definition
A smooth root transition can improve both structural continuity and cleanability.
However, the radius should not become so large that the drainage channel disappears.
The designer needs to balance:
Rib Support + Open Channel + Cleaning Access
How Can the Insert Affect Lid Sealing?
The drainage tray does not touch the sealing lip directly in a typical structure, but it can still influence lid performance indirectly.
If the insert or soap stack is too tall, it may push upward against the lid.
That can change:
- Lid shape
- Perimeter engagement
- Closing feel
- Opening force
This is why the insert should be validated with the actual case, lid and representative soap bar together.
A lid that works perfectly on an empty case may behave differently once the full internal assembly is installed.
How Should the Drainage Insert Be Reviewed Before Tooling?
The insert should be included in custom silicone mold development rather than added after the case mold has already been finalized.
Before tooling, review:
- Overall tray size
- Base thickness
- Rib height
- Rib width
- Rib spacing
- Root radius
- Edge clearance
- Removal tab
- Mold filling
- Venting
- Demolding direction
Long narrow ribs may create different molding conditions from a simple flat silicone sheet.
The tooling team should confirm that the rib array can be formed consistently.
Why Can Very Thin Ribs Create Production Problems?
Visually, thin ribs can look elegant.
But very fine geometry can be more sensitive to molding variation.
Possible issues include:
- Incomplete rib formation
- Irregular rib height
- Local deformation
- Difficult inspection
A slightly more robust rib may produce better consistency than a highly delicate design that provides no additional user benefit.
The target should be a manufacturable functional structure rather than the thinnest possible feature.
How Should the Insert Be Removed From the Mold?
The finished drainage tray also needs to be demolded.
The designer should consider:
- Rib direction
- Rib height
- Undercuts
- Pull-tab geometry
- Edge shape
- Product flexibility
A simple rib arrangement with appropriate geometry may release more consistently than a complex network of deep channels.
The molded sample should also be allowed to recover before final flatness is judged.
Practical Example: Removable Ribbed Tray for a Travel Soap Case
Consider a rounded rectangular custom silicone travel soap case designed for a standard shampoo or soap bar.
The product consists of:
- Soft lower silicone case
- Flexible removable lid
- Peripheral lid-engagement structure
- Removable ribbed silicone drainage insert
The insert uses five parallel rounded support ribs.
Version A — Ribs Too Low
The soap sits very close to the tray surface.
There is little usable separation beneath the bar.
Version B — Ribs Too High
The soap is elevated well, but the full soap-and-insert stack sits too close to the lid.
Version C — Spacing Too Narrow
The bar is supported, but the channels between ribs are difficult to rinse.
Version D — Tray Fit Too Tight
The insert looks neat but is difficult to remove without bending the case.
Optimized Version
The final structure balances:
- Rib height
- Rib spacing
- Rounded rib tops
- Tray thickness
- Edge clearance
- Removal tab
- Soap dimensions
- Lid clearance
The correct drainage insert is therefore part of the complete case system.
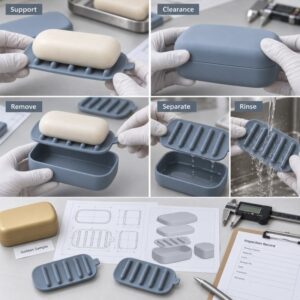
What Should Brands Test During Sample Approval?
Soap Support
Place the intended bar on the tray.
Check whether it remains stable without excessive rocking.
Internal Clearance
Install:
Insert + Soap + Lid
and verify that the lid closes without unwanted internal compression.
Tray Removal
Remove the insert using the intended finger or pull-tab area.
Check whether removal is intuitive and repeatable.
Tray Reinstallation
Place it back into the case and confirm that it sits in the correct position without excessive movement.
Water Separation
Introduce a defined small amount of water according to the agreed internal test method.
Check whether the soap-support surface remains meaningfully elevated above the lowest collected-water level under that test condition.
Cleaning
Remove and rinse the tray.
Inspect:
- Rib channels
- Rib roots
- Tray underside
- Pull tab
- Case bottom
Deformation
After removal, washing and reinstallation, confirm that the tray returns to its intended shape.
Multi-Sample Comparison
Compare several molded inserts for:
- Overall fit
- Rib formation
- Flatness
- Removal feel
- Surface quality
Silicone Drainage Insert Design Checklist
| Artikel | What the Brand Should Confirm |
|---|---|
| Target bar | Soap, shampoo bar, conditioner bar or other solid-care product |
| Bar dimensions | Minimum and maximum expected size |
| Tray size | Fits the lower case with controlled clearance |
| Base thickness | Stable but still practical to remove |
| Rib quantity | Enough support without unnecessary complexity |
| Rib height | Creates separation without lid interference |
| Rib width | Supports the bar without excessive contact |
| Rib spacing | Supports rinsing and stable positioning |
| Rib top | Rounded contact surface |
| Rib root | Smooth and accessible for cleaning |
| Removal feature | Finger recess, edge or flexible tab |
| Hardness | Validated with complete geometry |
| Soap clearance | Bar does not jam against case walls |
| Lid clearance | Insert and soap do not interfere with closure |
| Mold filling | Ribs reproduce consistently |
| Demolding | Insert releases without unacceptable deformation |
| Cleaning | Top, channels and underside remain accessible |
| Verpackung | Insert remains correctly positioned during shipment |
How LYA Silicone Supports Travel Soap Case Development
Für OEM and ODM development, a travel soap case should be evaluated as a multi-component product rather than only as an outer container.
Project development can include:
- Target soap-bar dimensions
- Case dimensions
- Lid structure
- Peripheral lid fit
- Drainage-tray size
- Rib quantity
- Rib height
- Rib spacing
- Tray thickness
- Removal feature
- Silicone hardness
- Entwicklung von Schimmelpilzen
- Sample production
- Functional fit testing
- Cleaning review
- Color customization
- Molded logo
- Verpackung
- Mass-production inspection
The objective is to make the insert functional without allowing it to consume unnecessary internal space or create new cleaning problems.
Frequently Asked Questions
Why does a silicone soap case need raised drainage ribs?
Raised ribs can support the soap above the lowest internal surface and create open space beneath the bar for residual moisture.
Are taller drainage ribs always better?
No. Excessive rib height reduces available internal clearance and may cause the soap to interfere with the lid.
Should a removable drainage tray fit tightly inside the case?
It should remain controlled in position, but an unnecessarily tight fit can make removal and cleaning difficult.
Should the drainage tray have holes?
Not always. A ribbed open structure may provide sufficient separation for some designs. Holes should only be added when they serve a defined functional purpose.
Can the drainage insert use a different silicone hardness?
It can, but the additional material specification should provide a clear functional benefit because it also increases production and quality-control complexity.
Why does the soap press against the lid after adding a drainage tray?
The insert increases the total internal stack height. Tray base thickness, rib height, soap thickness and lid clearance should be reviewed together.
Should the actual soap bar be used during sample testing?
Yes. The intended bar dimensions and shape affect support, clearance, lid closure and removal, so representative products or equivalent test samples should be included in validation.
Design the Drainage Insert as Part of the Complete Case
A good removable silicone drainage tray depends on:
Soap Size → Tray Size → Rib Height → Rib Spacing → Tray Thickness → Removal → Lid Clearance → Cleaning → Tooling
These variables need to work together.
The goal is not simply to add as many drainage ribs as possible.
The goal is to support the soap, create useful separation from residual moisture, remain easy to remove and clean, and preserve enough internal space for reliable lid closure.
If you are developing a custom silicone travel soap case, contact us with your target soap or shampoo-bar dimensions, case concept, drainage-insert requirements, color, logo, packaging concept and estimated order quantity.