 Polish
 English
 French
 German
 Spanish
 Chinese
 Japanese
 Korean
 Russian
Zawartość
Answer Excerpt
A silicone cat toy adhesive base can fail when the adhesive is incompatible with the mounting surface, the bond between the adhesive and silicone body is weak, or the base geometry converts normal licking and pawing into edge-peel stress. OEM buyers should validate the complete toy, backing and actual mounting surface together before approving mass production.
Why Does the Mounting Base Need Its Own Design Review?
A wall-mounted cat toy is not simply a silicone product with a sticker attached to the back. Its mounting system is a functional assembly involving three interfaces:
-
The wall-facing adhesive surface.
-
The adhesive-to-silicone interface.
-
The silicone body and its mounting-face geometry.
A problem at any one of these interfaces can cause the complete product to detach.
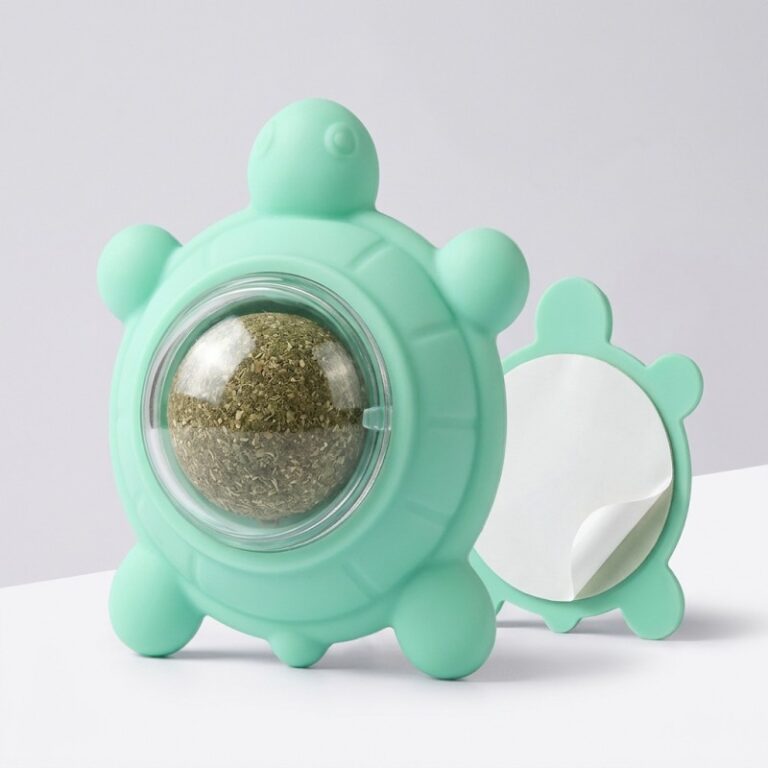
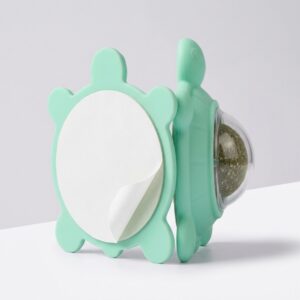
LYA’s reference product is a turtle-shaped silicone catnip lick toy. The product listing describes a wall-mounted adhesive backing and a replaceable catnip ball. Its product images also show a transparent central cover around the ball. This gives OEM buyers a real product structure to evaluate rather than an abstract mounting concept.
You can review the turtle-shaped silicone catnip lick toy and the wider silicone cat teething toy category.
The current product page does not specify the adhesive chemistry, peel strength, holding duration or repositioning cycles. Those should be treated as project requirements to confirm, not assumed product capabilities.
1. Identify Which Interface Is Actually Failing
Before changing the adhesive pad, identify where detachment begins.
| Observed problem | Possible cause | What to inspect |
|---|---|---|
| The entire pad separates from the wall | Surface is unsuitable, dirty, wet or poorly prepared | Surface material, finish, cleanliness and installation |
| Adhesive remains on the wall but separates from the toy | Weak adhesive-to-silicone interface | Silicone surface, adhesive compatibility and bonding process |
| One edge lifts first | Peel stress or incomplete contact | Base flatness, pad position and edge geometry |
| Paint or coating comes away with the pad | The surface coating is weaker than the adhesive bond | Coating condition and removal requirements |
| Toy rotates or tilts before detaching | Off-axis loading or insufficient mounting stability | Base footprint, body projection and load direction |
This distinction matters because each failure needs a different corrective action.
For example, increasing the adhesive area will not necessarily solve a weak bond between the adhesive and silicone. Likewise, changing the silicone hardness will not correct a wall surface that is dusty or unsuitable for the selected adhesive.
2. Match the Adhesive System to the Actual Mounting Surface
A mounting surface should be specified in the product brief, not described only as a “smooth wall.”
Different surfaces have different finishes, coatings, porosity and surface-energy characteristics. These differences affect adhesive contact.
The current product listing identifies smooth, clean glass, tile and metal as preferred mounting surfaces, while advising against textured or dusty surfaces. These are useful reference conditions, not a guarantee that every glass, tile or metal finish will perform identically.
| Target surface | OEM design consideration |
|---|---|
| Smooth glass | Confirm cleanliness, surface finish and installation conditions |
| Glazed ceramic tile | Check glaze condition, grout proximity and local surface flatness |
| Metal furniture | Confirm coating, finish and whether the surface is curved |
| Painted walls | Test the actual paint or coating; the coating itself may detach |
| Wood or laminate furniture | Check porosity, surface treatment and finish consistency |
| Textured or dusty surfaces | Do not assume reliable contact without specific validation |
Buyers should provide actual target-surface samples or clearly identified surface specifications.
If the product is intended for bathrooms or other humid environments, moisture exposure and cleaning products should also be included in the validation plan. A dry indoor test alone may not represent the intended installation conditions.
3. Design the Base to Resist Edge Peel
Adhesive joints experience different loading directions.
A toy hanging on a vertical surface places a downward load on the mounting system. This is primarily a shear-related condition.
However, a cat may also lick, paw or contact the front of the toy from an angle. These actions can create an outward pulling force. That force may start lifting an adhesive edge, creating a peel condition.
The base should therefore be reviewed for more than its total adhesive area.
Keep the mounting face flat
The rear mounting face should provide a continuous contact area. Curvature, molding distortion or an uneven surface can reduce effective adhesive contact.
Position the adhesive backing consistently
The adhesive footprint should be aligned with the intended load path. An off-center pad can leave one side of the toy more exposed to rotation or edge lifting.
Control the distance from the wall
A forward-projecting structure increases the lever arm between the toy body and mounting surface.
For example, a central cover or raised catnip chamber projects outward from the wall. Its position and the assembled product’s weight should be considered when reviewing the mounting base.
Review the edge profile
Rounded base corners and a controlled edge transition can help reduce local lifting points. The objective is to avoid creating an edge that catches easily during handling or use.
Balance base stiffness and body flexibility
A highly flexible body may deform under an off-axis load and transfer movement to the adhesive edge. The mounting area should maintain its intended contact geometry without making the whole toy unnecessarily rigid.
A larger adhesive pad is not automatically a better solution. Surface compatibility, contact quality, loading direction and base geometry must work together.
4. Treat the Silicone-to-Backing Bond as a Separate Interface
One important OEM consideration is that the adhesive must work on two different surfaces:
-
One side must bond to the silicone product.
-
The other side must bond to the selected wall or furniture surface.
These are not automatically the same bonding problem.
Silicone rubber can be difficult to bond with many conventional pressure-sensitive adhesives because of its low surface energy. A general-purpose adhesive tape should therefore not be assumed to bond reliably to a silicone body.
The project should specify an adhesive or backing construction that is compatible with the silicone-facing surface. Depending on the selected system, the adhesive supplier may recommend a particular carrier, primer or surface-preparation method.
The buyer and manufacturer should confirm:
-
Who supplies the adhesive backing.
-
Which adhesive system is intended for the silicone-facing side.
-
Which surface types are supported on the wall-facing side.
-
Whether surface preparation is required.
-
Whether the adhesive is intended for permanent or removable installation.
-
How the assembled bond will be inspected.
The current LYA product listing identifies an adhesive-backed mounting design, but does not publish the adhesive brand or chemistry. The exact backing construction and bonding process must be confirmed for each OEM project.
For general tooling and structural planning, buyers can also use the custom silicone mold development checklist.
5. Validate the Complete Toy on Real Surfaces
A loose adhesive sample is not enough to approve the mounting system. The complete assembled product should be tested with its actual mounting face, adhesive backing and front-facing components.
A practical validation sequence is:
Step 1 — Prepare representative surface samples
Use the actual glass, tile, metal, painted or furniture surfaces specified by the buyer. Record their finish and coating where relevant.
Step 2 — Follow the adhesive supplier’s installation instructions
Prepare the surface and apply the backing according to the selected supplier’s requirements. Confirm the required pressure, temperature and dwell time rather than inventing a universal installation procedure.
Step 3 — Check initial contact
Inspect the full adhesive footprint for wrinkles, trapped debris, incomplete contact and lifted edges.
Step 4 — Evaluate vertical holding
Mount the complete toy in its intended orientation. Check whether the product shifts, rotates or begins to detach under the agreed static loading condition.
Step 5 — Evaluate off-axis contact
Apply controlled outward and sideways loading that represents the expected interaction pattern. Inspect whether the adhesive edge begins to lift.
Step 6 — Include the complete front assembly
The catnip ball and transparent cover should be installed during relevant tests. Testing only the empty silicone body may not reproduce the actual assembled product’s weight and projection.
Step 7 — Check intended environmental conditions
If the product is designed for use near water or in frequently cleaned areas, include the specified moisture and cleaning exposure. Do not assume a dry-surface result proves suitability for wet conditions.
Step 8 — Record the results
Record the substrate, adhesive backing, preparation method, installation conditions, loading direction, observed movement and any edge lifting. The buyer and manufacturer should agree on acceptance criteria before sample approval.
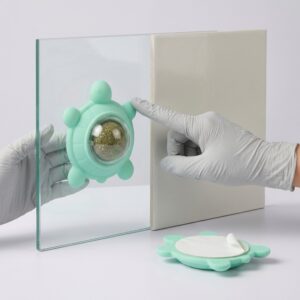
There is no universal holding-force or service-life value that can be assigned to every adhesive-backed silicone toy. The requirements must be established for the actual product and target market.
6. Production Inspection and Packaging Controls
After sample approval, the mounting system needs repeatable production checks.
| Inspection item | What to check |
|---|---|
| Mounting face | Flatness, cleanliness and visible defects |
| Adhesive backing | Correct type, size and position |
| Release liner | Complete coverage and easy removal as specified |
| Adhesive edges | No premature lifting, wrinkles or contamination |
| Silicone-to-backing bond | Consistent attachment and no visible separation |
| Product assembly | Catnip ball and cover correctly positioned |
| Appearance | Color, molding condition, flash and surface finish |
| Opakowanie | Liner remains protected and adhesive is not contaminated |
AQL sampling can support shipment inspection, but it should not replace functional mounting validation during product development.
For broader quality-control planning, see the AQL inspection guide for custom silicone products.
7. What Should Buyers Include in an OEM RFQ?
A useful RFQ should describe the complete installation scenario.
| Information | What the buyer should provide |
|---|---|
| Product concept | Reference photo, drawing or physical sample |
| Toy structure | Body shape, central cover and catnip-ball arrangement |
| Mounting surface | Glass, tile, metal, furniture or other specified material |
| Surface finish | Smooth, coated, painted, textured or other condition |
| Mounting location | Wall or furniture; indoor or other intended environment |
| Product assembly | Complete assembled weight and front projection |
| Interaction | Expected licking, pawing and directional contact |
| Adhesive requirement | Permanent, removable or repositionable installation |
| Backing responsibility | Buyer-supplied or supplier-coordinated adhesive system |
| Branding | Color, logo and packaging |
| Commercial details | Target market and estimated order quantity |
If the buyer does not have a complete drawing, a reference product and actual mounting-surface samples can help begin the design review.
Frequently Asked Questions
Is an adhesive-backed cat toy the same as a suction-cup cat toy?
No. The LYA reference product page specifies adhesive backing. A suction cup uses a different mounting mechanism and requires a different design and validation approach.
Will an adhesive-backed silicone cat toy stick to any wall?
No. Surface finish, cleanliness, coating, moisture and adhesive compatibility all matter. The product listing identifies smooth, clean glass, tile and metal as preferred surfaces, but the actual target surface still needs testing.
Does using a larger adhesive pad always prevent detachment?
No. A larger pad cannot compensate for an unsuitable adhesive, weak silicone-to-backing bond, uneven mounting face or excessive peel loading.
Can ordinary double-sided tape bond directly to silicone?
It should not be assumed. Silicone can be difficult to bond with conventional adhesives. The silicone-facing adhesive system should be selected and validated for the actual material and process.
Should the toy be tested with the catnip ball installed?
Yes. The complete assembled product should be included in relevant mounting tests so that its actual weight and front-facing geometry are represented.
OEM/ODM Development for Pet Brands
For a wall-mounted silicone cat toy, the adhesive backing is part of the product’s functional design. It should be reviewed alongside the silicone body, the central catnip structure, the target mounting surface and the intended interaction.
LYA’s existing cat toy range provides a product reference for brands developing wall-mounted lick toys and other interactive pet products. Its broader custom silicone cat teething toy manufacturing guide explains the wider product-development process.
LYA’s OEM/ODM silicone manufacturing service can be consulted for custom silicone product projects. For adhesive-backed designs, buyers should provide the target surface, required mounting behavior and backing specification so that the actual project scope can be reviewed.
If you are developing a wall-mounted catnip lick toy or a private-label silicone pet accessory, prepare your reference design, mounting-surface samples, adhesive requirements, color, logo, packaging and estimated quantity, then contact LYA Silicone to discuss the project.