 Chinese
  English
  French
  German
  Spanish
  Polish
  Japanese
  Korean
  Russian
 目录
Answer Excerpt
A well-designed silicone baby food freezer tray should allow individual frozen portions to release without requiring excessive force or causing the entire tray to collapse.
Easy release depends on the relationship between cavity shape, bottom radius, wall flexibility, cavity depth, silicone hardness, spacing between cavities and the stiffness of the surrounding tray frame. For OEM baby feeding products, these features should be validated using filled and frozen molded samples before mass production.
Why Can Frozen Food Be Difficult to Release from a Silicone Tray?
Silicone is flexible, but flexibility alone does not guarantee easy release.
A freezer tray still has to perform several functions at the same time:
- Hold liquid or puree while being carried
- Keep individual portions separated
- Remain reasonably stable inside the freezer
- Support a lid where required
- Allow one portion to be pushed out
- Recover after repeated deformation
If the cavity is too stiff, the user may need excessive thumb pressure.
If the cavity is too flexible, pressing one portion may bend the complete tray.
The key question is therefore not:
“Is the silicone soft enough?”
It is:
“Can the cavity deform locally while the rest of the tray remains controlled?”
Why Does Cavity Shape Affect Easy Release?
The internal shape determines how the frozen portion contacts the silicone.
Common cavity concepts include:
- Rounded square
- Circular
- Oval
- Rectangular
- Dome-like
- Brand-specific shapes
Simple rounded shapes are usually easier to evaluate than highly decorative cavities with narrow corners.
When a frozen portion is pushed upward, the silicone wall needs to move away from the frozen food.
If the cavity contains deep corners or abrupt geometry, more of the frozen portion may remain mechanically engaged with the wall.
The design team should therefore review:
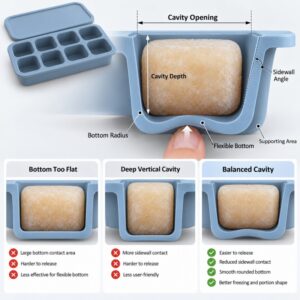
- Sidewall angle
- Bottom radius
- Corner radius
- Cavity depth
- Opening size
as one geometry.
Why Is the Bottom Radius So Important?
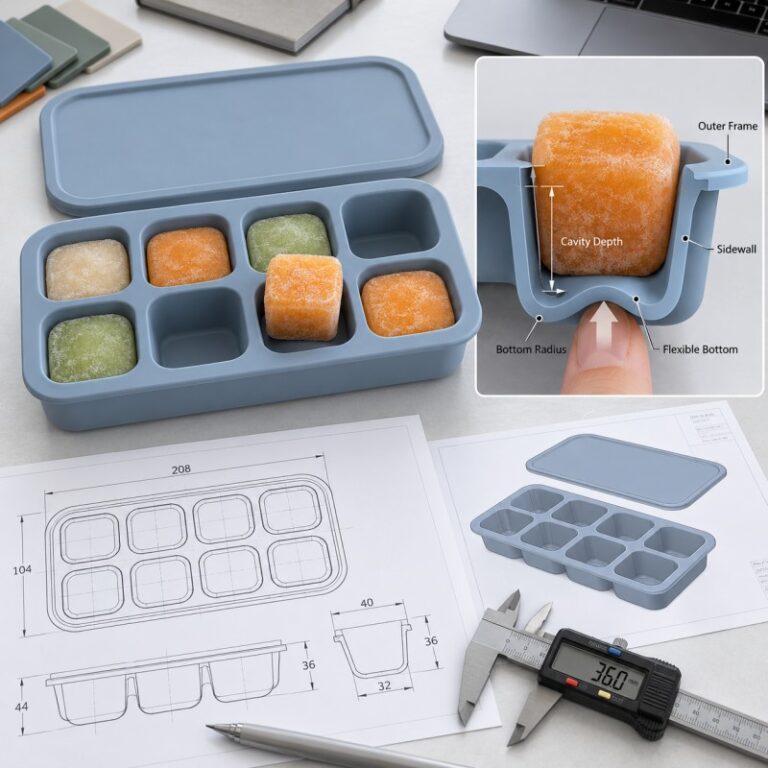
The bottom of the cavity is normally the area that the user pushes first.
A very flat, broad bottom may require a larger area of silicone to deform simultaneously.
A smoothly rounded bottom can help concentrate the initial pushing movement and allow the frozen portion to begin separating progressively.
However, the bottom should not become excessively thin or sharply curved.
A practical design needs enough local flexibility while still maintaining:
- Stable cavity shape
- Predictable volume
- Repeatable molding
- Adequate structural support
The best bottom geometry is therefore determined by testing the actual frozen portion rather than evaluating the CAD image alone.
How Does Cavity Depth Change Release Force?
A deeper cavity creates a taller frozen portion.
This increases the amount of sidewall that remains in contact with the frozen food during release.
A shallow portion may separate more quickly.
A deep portion may require more progressive wall deformation.
That does not mean deep cavities are incorrect.
The depth should match the brand’s intended portion size.
The design should then adapt the:
- Wall angle
- Bottom geometry
- Wall flexibility
- Opening dimensions
to that depth.
Cavity capacity and easy release should therefore be developed together.
Why Does Wall Flexibility Need to Be Localized?
The cavity needs to flex, but the complete tray should not behave like an unsupported sheet.
This is where wall thickness becomes important.
The cavity bottom may require more flexibility than the outer perimeter.
The surrounding tray frame may require more stability so the user can hold the tray while pushing one portion.
A useful tray structure may therefore contain several functional zones:
- Flexible cavity bottom
- Controlled cavity sidewall
- Supported cavity connection
- More stable outer rim
- Defined lid-contact area
The objective is not uniform softness.
The objective is controlled deformation in the areas that need to move.
Why Can an Overly Soft Tray Perform Poorly?
A very soft tray may initially appear easy to use.
But when a user pushes one cavity, the surrounding cavities may also move.
This can create:
- Excessive overall bending
- Difficult one-handed release
- Unstable handling when filled
- Twisting while moving the tray
- Poor lid alignment
Silicone hardness should therefore be evaluated together with cavity geometry and the perimeter frame.
A softer compound cannot compensate for a poorly supported tray structure.
Likewise, increasing hardness should not be used as the only solution for a tray that bends too much.
Why Does the Outer Rim Matter During Portion Release?
The outer rim gives the user’s other hand a stable place to hold the tray.
If the rim is too flexible, pushing one cavity may cause the complete product to fold.
If the rim is unnecessarily bulky, the tray becomes heavier and uses more freezer space.
A controlled rim can improve:
- Carrying stability
- Portion release
- Lid alignment
- Tray flatness
- Stacking
The rim should therefore be treated as part of the functional release system, not merely as an outside border.
How Does the Space Between Cavities Affect Performance?
Adjacent cavities need enough structural separation.
If cavities are placed extremely close together, the wall between them may become difficult to control.
Pushing one cavity may distort the next cavity.
Very wide spacing, however, increases the total tray footprint.
Brands therefore need to balance:
Portion Quantity → Cavity Size → Cavity Spacing → Tray Footprint
This becomes especially important when trying to increase the number of portions without making the tray too large for typical freezer storage.
How Should Portion Capacity Be Controlled?
A freezer tray is often sold around the idea of repeatable portions.
That means each cavity should be designed around an intended volume rather than only visual appearance.
For projects where portion volume matters, capacity accuracy should be verified on the finished molded tray.
The engineering team should evaluate:
- Internal cavity geometry
- Intended fill level
- Cavity depth
- Bottom radius
- Molded dimensions
- Product deformation during filling
If molded measurement marks are added, they should also correspond to the intended fill method.
A molded line that looks correctly positioned in CAD is not automatically a verified capacity indicator.
Should Every Cavity Have Exactly the Same Geometry?
For a conventional portion tray, consistency is normally desirable.
If eight cavities are intended to provide equivalent portions, buyers should compare:
- Opening dimensions
- Depth
- Bottom shape
- Wall geometry
- Actual capacity
- Release behavior
across the complete tray.
One cavity releasing perfectly does not automatically prove that all cavities perform the same way.
Why Can Cavity Position Affect Release?
Cavities near the edge of the tray have different surrounding support from cavities in the center.
An edge cavity may be close to the reinforced outer rim.
A center cavity may be surrounded mainly by other flexible cavities.
As a result, the user may feel different resistance when pushing:
- Corner cavities
- Edge cavities
- Center cavities
Sample approval should therefore include several positions across the tray.
This is particularly important for larger multi-cavity layouts.
How Should the Lid Be Considered?
A lid introduces another functional relationship.
The lid may need to:
- Fit the tray perimeter
- Remain above the intended fill level
- Support stacking
- Stay aligned during freezer storage
If the lid sits too close to filled cavities, it may contact food before freezing or press against the frozen portions afterward.
If the lid fit is too loose, stacking and storage may become less controlled.
The tray, fill level and lid should therefore be tested together rather than approving the empty tray first and adding the lid later.
Should Frozen-Food Expansion Be Considered?
Yes.
The exact behavior depends on the food formulation and fill condition, so the product team should not assume that the frozen contents will behave exactly like the liquid state.
Brands should define an intended fill level and leave appropriate clearance for the selected application.
Testing should use the actual food formulation where practical, or a representative test medium agreed by the buyer and manufacturer.
Avoid designing the tray around an unrealistic completely overfilled condition.
Why Do Measurement Marks Need Careful Placement?
Some baby food trays use molded numbers or fill lines to help identify portion size.
These features should remain:
- Visible
- Moldable
- Easy to clean
- Separate from critical flexible zones
Very thin raised markings can become difficult to reproduce.
Very deep recessed markings can create unnecessary cleaning grooves.
For a portion tray, measurement graphics should support the product function without interfering with easy release.
How Should the Tray Be Reviewed Before Tooling?
Before custom silicone mold development, the buyer and manufacturer should confirm:
- Overall tray dimensions
- Cavity quantity
- Individual cavity capacity
- Cavity shape
- Cavity depth
- Bottom radius
- Wall structure
- Outer-rim support
- Silicone hardness
- Lid structure
- Measurement markings
- Logo position
- Surface finish
- Critical inspection points
Tooling review should also consider filling, venting, demolding and the repeatability of the cavity geometry.
The final product should not depend on excessive manual finishing to obtain consistent cavity edges.
Practical Example: Eight-Cavity Baby Food Freezer Tray
Consider an eight-cavity rectangular tray designed for individual baby food portions.
The tray uses:
- Eight rounded-square cavities
- Flexible cavity bottoms
- Smooth internal radii
- Reinforced outer rim
- Matching removable lid
Version A — Bottom Too Stiff
The tray remains flat, but users need excessive force to release a frozen portion.
Version B — Complete Tray Too Soft
Individual cavities flex easily, but pressing one portion twists the entire tray.
Version C — Cavities Too Deep With Nearly Vertical Walls
The frozen portions have a large sidewall contact area and are harder to release.
Optimized Version
The final design balances:
- Portion volume
- Bottom flexibility
- Sidewall geometry
- Bottom radius
- Cavity spacing
- Outer-frame stability
The objective is local deformation without uncontrolled movement of the complete tray.
What Should Brands Test During Sample Approval?
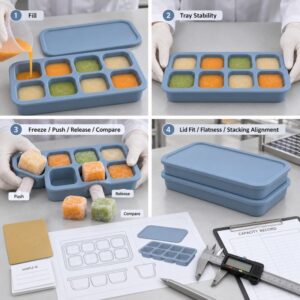
Filling Stability
Fill all cavities to the agreed level.
Lift and move the tray in the way a consumer normally would.
Check whether the center bends excessively.
Capacity Check
Verify representative cavity volumes using the agreed method.
Frozen Release Test
Freeze the intended product or representative test medium under defined conditions.
Push out:
- Corner portions
- Edge portions
- Center portions
and compare their behavior.
Single-Portion Release
Confirm that one portion can be released without accidentally ejecting neighboring portions.
Shape Recovery
After pushing several cavities, allow the tray to recover and inspect whether the bottoms return toward the approved geometry.
Lid Fit
Test the lid before and after freezing under the intended fill condition.
Cleaning Review
Inspect cavity corners, measurement marks, rim transitions and lid details after washing.
Multi-Sample Comparison
Compare several molded trays rather than approving one ideal sample.
Silicone Baby Food Freezer Tray Design Checklist
| 项目 | What the Brand Should Confirm |
|---|---|
| Cavity quantity | Matches portion strategy and tray size |
| Portion capacity | Defined before tooling |
| Cavity shape | Suitable for filling and release |
| Cavity depth | Balanced with intended portion |
| Bottom radius | Supports progressive release |
| Cavity wall | Flexible enough without uncontrolled collapse |
| Outer rim | Stable enough for carrying and release |
| Cavity spacing | Supports independent deformation |
| Silicone hardness | Evaluated with complete tray geometry |
| Lid | Fits the filled tray and supports intended storage |
| Measurement marks | Clear without disrupting cleaning or flexibility |
| Release test | Performed after actual freezing |
| Cavity positions | Corner, edge and center compared |
| Mold consistency | Cavity geometry remains controlled |
| Cleaning | Smooth accessible internal surfaces |
| 包装 | Does not permanently deform the tray |
How LYA Silicone Supports Baby Feeding Product Development
LYA Silicone supports OEM and ODM development for custom baby feeding products, including portion trays, feeding bowls, plates, snack cups, bibs and related silicone products.
Project development can include:
- Cavity-layout review
- Portion-capacity planning
- Material and hardness discussion
- Wall-structure review
- Lid development
- Molded marking review
- Color and logo customization
- Mold development
- Sample production
- Capacity validation
- Frozen-release testing
- Packaging review
- Mass-production inspection
These products can also be developed as part of broader 硅胶婴儿用品 collections when brands want coordinated colors, packaging and product positioning.
Frequently Asked Questions
Does Softer Silicone Always Make Frozen Portions Easier to Release?
No. A softer cavity may flex more easily, but if the entire tray becomes too soft, handling and single-portion release can become less controlled.
Are Round Cavities Better Than Square Cavities?
Not automatically. Rounded geometry can simplify transitions, but rounded-square and other shapes can also work when the wall angle, corner radius and bottom structure are properly designed.
Why Does the Center of a Freezer Tray Bend More Than the Edges?
Center cavities are farther from the supported perimeter and may have less structural reinforcement around them.
Should Portion Capacity Be Checked on Molded Samples?
Yes. Final capacity should be evaluated on the molded product using a defined test method when portion volume is part of the specification.
Can Measurement Marks Be Molded Into the Tray?
Yes, when the geometry is suitable. Their size, depth or height and location should be reviewed for readability, molding and cleaning.
Should the Tray Be Tested With Real Baby Food?
Where practical, the intended formulation is useful because different frozen products may behave differently. A representative agreed test medium can also be used during engineering validation.
Does Every Cavity Need to Be Tested?
During development, representative positions across the tray should be compared, particularly corner, edge and center cavities. Critical requirements should also be controlled during production according to the agreed inspection plan.
Design for Filling, Freezing and Release as One System
A successful freezer tray depends on:
Portion Capacity → Cavity Geometry → Bottom Flexibility → Cavity Spacing → Outer Rim → Lid → Freezing → Release
These variables work together.
A tray should not be made extremely soft simply to improve release, and cavities should not be made unnecessarily deep simply to increase capacity.
If you are developing a custom baby food freezer tray, contact us with your required tray dimensions, cavity quantity, target portion volume, lid concept, material requirements, color, logo, packaging and estimated order quantity.